Sunday, October 31, 2010

SNOTD

Happy Halloween!!!  Not quite orange, but close enough!

This is Mary Kay H018 Coral Glow.  Fun summer beach color but I thought I would break it out of the vault for Halloween!

I need to find out if MK even makes nail polishes anymore.  This is a great formula.  Not super thick, dries in a reasonable amount of time and if you are careful with your application, one coat works well.  I have 2 coats on today. 

Happy Halloween!!!

No Halloween is complete without a carved pumpkin and roasted pumpkin seeds!


This was really easy.  I always buy the pumpkin carving kits on clearance after Halloween for around a $1.  They have a ton of patterns in them.  Just photocopy the one you like, tape it to the pumpkin and start punching out the pattern.  You will use the dot matrix to carve out your pumpkin.


Now on to the roasted pumpkin seeds... Scoop them out, rinse them off, add a little seasoning salt and butter. 15 minutes in a 350 degree oven and you have delicious roasted pumpkin seeds!


Separate out as much of the pumpkin as you can stand. 

Add water and the pumpkin seeds float and the left over pumpkin bits sink.  Scoop out the seeds with a slotted spoon into a colander to drain the excess water.  Then spread them out on a baking sheet and add melted butter and seasoning salt.


15 minutes later at 350 degrees....


Pumpkin seeds are a great source of phytosterols which are found in all seeds and nuts are helpful in loawering cholesterol.  Pumpkin seeds in particular are an excelent source of the minerals such as phosphorus, magnesium and manganese, zinc, iron and copper. In addition, pumpkin seeds are a good source of protein and vitamins A and K.  To see a more indepth nutrional analysis, click here.

Wednesday, October 27, 2010

Cheesy, warm delight on a cold Fall day...

When I am feeling adventurous and want to try out a new recipe, I usually turn to Big Girls, Small Kitchen for inspiration.  They always have fun recipes to try out.

I had some leftover zuchinis that my mom brought over from her garden and I have frozen a ton of zuchini bread so I needed another option!  I found a recipe for Zuchini and Rice Gratin.  It's a quite simple recipe.  Instead of arborio rice, I had brown rice on hand.  I didn't have arugula or onions either so skipped that as well.  Oh and I had yellow cheddar not white!  I also added red pepper flakes for a little spice.  So I fudged the recipe a little and it still came out great!

I chopped up some zuchini and sauteed it with a little olive oil, garlic, onion powder, salt, pepper and thyme.  I put in a pat of butter at the end.  Combined that mixture when the zuchini was softened to the cooked brown rice.  Then I added 2 beaten eggs and some cheddar cheese.  Turned that mixture out into an 8x8 baking dish, topped it with 1/4 bread crumbs and 40 minutes later I got this:


I let it cook for 15 minutes and mmm...  Great way to get your veggies!  (and cheese!)

Tuesday, October 26, 2010

ANEW Lash-Transforming Mascara + Serum

Well it's been a month so far...  Well actually 2 but consistantly a month.  I've alwys had thicker and longer lashes up until this year.  I began to notice that they were getting a little thinner.  Also my bottom left lash line has always been a bit wonky.  The lashes are curly and sparse while my right lower lash line are thicker, longer and straight.  It has always annoyed me slightly since I began wearing makeup in middle school.  My top lashes are super straight, I always need a curl to see them! 


Dual ends.  One end is the serum and the other mascara.  It is offered in both black and brown.

The mascara isn't too bad.  I still prefer my Covergirl Lash Blast or Waterproof Wet n Wild.  The serum is the reason for my purchase though!  It feels cooling to the skin as it dries, like a liquid liner.  After the serum is totally dry, it does not seem to interfere with my makeup application.  I have been putting a very thin line right at the base of the lashes.  I've seen the commercials for Latisse and just in case, I do not want any discoloration.  I also haven't had any irritation, itchiness, etc..

I honestly did not think that this was going to work.  It just seemed too good to be true.  Good price, AVON, etc...  Well my bottom left eyelashes are much thicker.  It is super noticeable.  When I first tried out this product I literally only had a few lashes on my bottom left eye.  For some reason they all decided to fall out at once.  Well they grew back thicker than they ever had before.  Usually I can cover up the sparseness with a little eyeliner and mascara applied to the lashes that are present.  No need anymore if this product continues to work.  I'm quite impressed.

I actually did not use the product everyday, day and night.  I would skip a day here and there and only use it at night.  I do not have a second to spare in my morning routine and it does take a few minutes to dry.  I have no discoloration around my eyes where I have applied the product.

So it's a winner!  If you want to start out with a more affordable alternative to growing your lashes, AVON is for you.  I will continue to use it and repurchase for sure.  I wish that they would just sell the serum separately because I like to use my own mascara.  I haven't tried any of the other products out there so I have nothing to compare it to but this is the first time in a long time that I full set of bottom lashes on my left eye.  I just couldn't imagine better results.  I'm super excited about that!

It retails for $20 but you can always get it on a sale if you are patient!

Monday, October 25, 2010

ULTA 20% off this week...

Use code 47139 at checkout!  There are some exclusions though.  The discount doesn't apply to Benefit unfortunately.  Bummer...  I've been wanting to get my hands on that Powderflage!  One of these days I'm just going to order it and be done with this no spending policy!


30 more products to go...  Actually 28, I've finished a couple of things this week.  Yay!

Sunday, October 24, 2010

SNOTD


This is one coat of Rimmel Lasting Finish Pro in 420 Midnight Blue.  One coat folks!  It has a wider brush so one swipe for the pinky, 2 swipes for the thumb.  I constantly wear this on my toenails and yes they are permanently stained blue I'm sure!  I love this color.  I thought I would try it out on my fingernails this week.  It lasts weeks on my toes so I'm sure it will last the 10 days it is advertised to last on my fingernails.  I've worn Rimmel Lasting Finish Pro in 270 Steel Grey but I can't remember how long it lasted. 
I'll test this one out! 

I love the formula of the Rimmel Lasting Finish Pro.  It goes on perfect and smooth everytime. 

Here's my order of brand preference:

1.  Rimmel Lasting Finish Pro: (if you couldn't guess)

2.  AVON nail wear:  It has the same thickness as the Rimmel but the thinner traditional brush.  Oh and of course, super affordable at $1.99 or $2.99 depending on whether or not you buy it on sale.  It will last you a week as well if you apply with a base coat and a top coat. 

3.  NYX:   Some colors can be a bit strong smelling but they have a lot of fun colors to choose from and anoher affordable brand.  $3 at comcherryculture.com  In fact, I just spied out a bunch of colors I need to try out!  I'll need to wait for sale though and do a haul.

4.  Sally Hansen Insta-Dry:  It truly dries super fast but only lasts on the nails for a couple of days.  Also featuring the wider brush like Rimmel but the formula is even thicker so you really need to get it on the nails rather quickly and not mess with it until the nails are completely dry.  Then you can go over it with another coat.  But 1 to 2 coats is all you need.
 
5.  Revlon:  Great colors but the formula is thin and it takes several coats to achieve the desired look.  Takes forever to dry with that many layers of polish as well.

6.  Sinful Colors:  I only have one color in this brand and I really have to load it on to see the true color on my nails.  It goes on very sheer the first couple of applications. 

7.  Mary Kay:  It's the only other brand I have.  I only have one color and I haven't worn it in forever.  I'll break it out next week.  I'm not sure if MK still makes nail polish!

Thursday, October 21, 2010

Fall favorites

Well technically this is the first time I tried this recipe.  I had a bag of pears and some leftover apples and thought, can I make a pie using both?  Sure can!  I used this recipe...  Spiced Apple and Pear Pie from Food Network.

I opted to make my own pie crust only because I didn't have the store bought variety on hand!  But honestly, it takes just a few more minutes and you have homemade dough!  If you have a food processor, it's even faster. 

Always start off with cold cubed butter:


Leave it in the fridge until you are ready to use.  In the food processor but in your flour, sugar and salt.  Then add 1/4 cup of the cubed butter and pulse.  When that is incorporated, add the rest in small amounts until the mixtures resembles peas.


Not quite peas but you get the idea.  Than add one beaten egg combined with very cold water.  Notice the ice cubes in the water.  You want it very cold...  It makes for a flakier crust if the butter stays cold.

Add this to the butter, flour, sugar mixture in the food processor and pulse until combined.  Then turn out crust on to plate.  It should look something like this. 


The best option is to turn it out on to plastic wrap but I'm out for the moment.  So I formed it into a ball and put it in a gallon plastic resealable bag.


The dough needs to chill for at least an hour.  Perfect amount of time for mid-baking cleanup and preparation of the apple and pears!

Peel, core and cut apples and pears into 1/2 inch slices.  Mix with sugar, cinnamon, ginger, salt, lemon juice and nutmeg.  I put it in a tupperware container with a top and shake the mixture to distribute the sugar and spices evenly.


Then on to the stove.  Cook the apples and pears with some butter and flour until you get a compote like consistancy.  After cooking, stir in 1/2 teaspoon of vanilla extract.


The mixture needs to cool completely.  If you are in a hurry, put over ice.  That's what I did!  Quick cool down.  While cooling, take out your dough from the fridge and cut in half.  One for the bottom crust, one for the top crust.


Don't forget to flour your surface well and your rolling pin.  Look, it's so easy even my 2 year old son can do it!  lol 

The best way to roll out pie crust evenly is to start rolling from the middle and to turn the dough and roll from the center out again. It ensures that you get a circle, or at least close to a circle and since you keep turning it, you know it's not sticking. The worst is when you get your circle perfect and then try to lift and it tears because it sticks. Keep turning and rolling the dough and it will prevent that from happening.

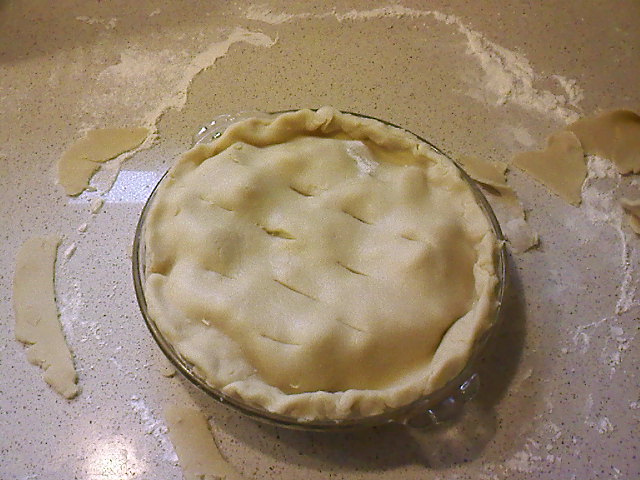
Roll out the first disk for the bottom of the pie dish, add the cooled filling and then roll out the second disk for the top crust.  Trim the crust to about 1/2 inch beyond the dish for crimping.  I'm absolutely horrible at this.  I blame my nails...  But the main idea is to pinch the bottom crust to the top crust forming a seal so all your delicious filling doesn't bubble out!


Follow up with a little egg wash, sprinkle of sugar and some steam vents and into a 375 degree oven it goes for about 55-65 minutes.  Check on it about half way to make sure it isn't browning too quickly. 


If the pie is getting dark quickly, cut off some aluminum foil and drape around the edges of the pie.  I have a pie ring that I use.  Put the aluminum foil or pie ring on after baking 20-30 minutes.  If you put it on while the pie crust is raw, the foil will stick and it will tear the pie apart when you attempt to take it off after baking. 

So hopefully after 55-65 minutes, you'll have something that resembles this:


Mmm...  And yes it is delicious as it looks, especically with a scoop of vanilla ice cream!

Wednesday, October 20, 2010

Super duper tonor!


pure calmille with organic chamomile alcohol free tonor

If you are a fan of tonor or you have been wanting to try a tonor, you need to purchase this from Yves Rocher.  It retails for $11.  I happened to buy it on-sale a while ago. 

It's super gentle and alcohol free.  It leaves the skin feeling soft and fresh.  It also removes make-up very effectively on it's own.  Eye make-up as well.  I prefer a creamier eye makeup remover but in a pinch, this tonor will get the job done. Of course the best course of action is to cleanse your face and then follow up with this tonor to remove remaining traces of make-up and cleanser to tighten up the pores.

It's made with oraganic chamomile which is super soothing.  It's the best tonor I have ever come across and probably the last one I will try.  It is that good.  pure camille comes in a huge 200ml (6.7 fl. oz. ) bottle which lasts forever!  More bang for your buck which is a pretty savvy purchase...

Tuesday, October 19, 2010

AVON Advance Techniques Revitalizing Treatment


I'm pretty sure I picked this up on an AVON sale for $3.  Initially I like it.  I like the smell and the texture and shine of my hair after blowdrying.  But I noticed that later in the day my hair feels sort of crunchy and needs a good brush through and then it looks great again.  Not sure if it's the cold dry season change of the fall or the product... 

After reviewing the ingredients, I see hydrolyzed wheat starch.  Hmm... starch equals stiff which may equal crunchy? 

It does help against static and my hair is at least initially soft and smooth when I leave the house in the morning!  It is also supposed to reduce fall out when brushing your hair. Which will normally happen when the season changes. I have major fall out in the spring so if the bottle lasts until then, I'll be sure to comment on it! 

Monday, October 18, 2010

My new foundation HG!!!


WOW! WOW! WOW!  Maybelline Dream Matte Mousse Foundation is AMAZING!!!  I've been looking at it on the shelves for months, I bought a month ago (with coupons on-sale at Rite Aid of course) and finally broke the plastic off and tried it out!!!  I never get the correct shade on the first try but I grabbed Light 1 in Porcelain Ivory.  It comes in 6 light shades, 6 medium shades and 4 dark shades.  That is a pretty good selection.  I'm more like a Light 2 in Classic Ivory but I saw that it had yellow undertones.  Light 1 is slightly pinker which I need. 

The coverage is absolutely amazing.  I would say it's a medium coverage.  It's a very creamy, moussy delight. I barely dipped my brush in the tub and had the most perfect coverage.  It doesn't look cakey or heavy, just flawless.  In fact the first time I tried it out, I didn't use a primer or base or finishing powder and it stayed matte and perfect for hours.  Because the brush worked so well I haven't even tried it with a sponge or my fingers.  Just very lightly dip your foundation brush into the tub and swirl and buff the foundation into your skin.  You will absolutely love it!

Maybelline Dream Matte Mousse retails for around $7 

Sunday, October 17, 2010

SNOTD

This is really a spring/summer color but I felt like something light this week.


I wish I had this in matte or a matte topcoat.  It would look super lovely as well.  This is NYX NP 02 Ocean.  This formula is super stinky.  The smell goes away as it dries but stinky nonetheless.  Stinks like nail polish really but stronger.  Maybe it's the metallic.  I don't remember NYX Jungle smelling so strong. 

Fun color though.  This is three coats.

Saturday, October 16, 2010

Another product I've had forever...


e.l.f. Cream Eyeliner!  I just love e.l.f.  Not only are their products super affordable and great quality, they always have a sale!  I purchased the cream eyeliner in midnight.  The brush that is pictured above it is from AVON.  I love this brush for applying cream eyeliners.  The angle of the bend really helps me to apply a nice straight line and the bristles of the brush are soft, yet firm allowing for smooth application.

After applying the line and letting this product set, it has excellent staying power.  It doesn't budge.  The midnight is a blue black, where the black is a red black.  I like blue blacks for my cool coloring. 


The original line also comes in coffee and ivory.  I just noticed that they have 4 new colors!  Metallic Olive, Copper, Gunmetal and Purple.  I will be purchasing them all for sure next 50% off sale. 

For a retail price of $3, you really can't go wrong with this product.

Friday, October 15, 2010

NYX Eyeshadow Base


I've had this stuff forever.  I purchased it from Cherry Culture.  They were out of the skin tone at the time so I figured Pearl was the next best thing since I tend to wear mostly shimmer eyeshadows.  It really brings out the color of shimmery eyeshadows.  It will crease on my eyelids, which tend to be oily so I do need an eyelid primer underneath this base.  It is actually a nice browbone highlighter.  After blending and working it in, it leaves a nice soft subtle shimmer.  It's great for the inner corner as well to instantly brighten.  You could even use it as a cheek highlighter in a pinch, if you like a shimmer or course!


This is a quick swipe of the base to show the color.


This is after working it in.  Hopefully you can see the subtle shimmering effect it makes.

The eyeshadow base retails for $6. 

Thursday, October 14, 2010

Apriori Night Repair


One day I had this email in my inbox from an Apriori rep.  I have since lost the email!  But I think I signed up for a free sample.  Well now I constantly get newsletters from Apriori.  In one, I saw that you could trade in an anti-aging skin or eye cream that didn't work for an Apriori product.  Well I have a ton of those hanging around of course, like many of us, so I sent it in along with a check for $15 to cover shipping and handling.  Three weeks later I received the Cellular Age Advantage Night Repair.  I had several choices and decided on a night repair since I have a ton of day lotions!

First of all, love the bottle.  It's a pump.  It does tend to get some air pockets but a light tap fixes that.  It also has a smell that took my over a week to figure out.  The smell is reminiscent of this night serum I used to use from Arbonne.  Citrusy, with a hint of something else.  After a brief look on the Arbonne site, they either changed the packaging or discontinued the line I used for a couple of years.  I loved Arbonne but it just got way too expensive for me.  The products were wonderful, lasted a long time and made my skin look and and feel great but just too dang expensive!

Okay so back to Apriori.  Another pricey line.  But I'm glad that I am able to try the night cream for $15.  It normally retails for $75.  After using it for about 4 weeks now, my skin has a wonderful healthy glow.  I even smooth it on my neck with no reaction what-so-ever.  My neck is super sensitive and prone to allergic breakouts.  Not pretty.  I do not see much difference in fine lines, which I really do not have many, but my complexion looks great.  I tend to get a little red at times, especially in the winter and of course summer if I don't apply spf.  So overall I'm pleased with the results of this product.  Can I afford to re-purchase?  Not sure if I can justify it. 

Here's some info from the website:

TECHNOLOGIES & BENEFITS


• Contains the NutrientReservoir™, which protects and nourishes skin cells by addressing the 4 core influences of aging: Oxidative Stress, Genetics, Hormonal Fluctuation, and Mitochondrial Function.


• Works “3 Layers” Deep! This highly nourishing cream incorporates ingredients to support cell structure and function from the surface to the deepest skin cell layers.


• Ingredients provide concentrated support for skin structure and function. Nutrient rich cream targets the visible signs of aging at night, while the majority of repair and regeneration take place.


• Thicker nighttime formula helps prevent transdermal water loss at night to leave skin feeling and looking supple and hydrated.


• Sulfate, Paraben, and Fragrance Free! Gentle and effective formula perfect for all skin types.

They are also organic which is a huge plus for me!

BEAUTY THROUGH PURE PRODUCT INNOVATION


The two key words in Apriori Beauty's product philosophy are "pure" and "innovation." Every product formulation is pure, meaning it is free of toxic, controversial and unnecessary ingredients, including:


Zero SLS or SLES


Zero parabens


Zero synthetic fragrances or dyes


Zero harsh or toxic chemicals


Zero animal ingredients or testing


Each product is also developed with only organic, performance and natural ingredients that produce results. Every product is also innovative. First of their kind, patent-pending technologies embrace each product line, including natural delivery and natural preservative systems. Each skin care formulation is also Dermatologist-tested and pH correct.


They do have a 30 day supply of the enture Cellular Age Advanatage line for $145.  I'm sure it will last longer than 30 days.  The Night Repair seems super concentrated.

So if my skin goes to crap after finishing this product, I'll be contacting a rep promptly!

Wednesday, October 13, 2010

Fiber. It does a body good.


We all know or heard about the importance of eating fresh fruits and veggies and whole grains. We all know too well that most of us of lacking fiber in our diet. But there is a connection between a beautiful healthy colon and a beautiful healthy skin! If your colon is in good shape, you feel and look better! Beautiful skin comes from within. If you are consuming bad food choices, it will undoubtedly manifest itself in the appearance of your skin.


Did you know that acne may be caused by food allergies?! The body rids itself of toxins through the skin. Acne is also caused my hormones which can sometimes be kept in check by eliminating or consuming the right foods. By consuming the right amount of fiber, it will help to eliminate those toxins.


So in an effort to get in my daily fiber requirement, I picked up some Metamucil Clear and Natural. I've tried Metamucil in the past. Mostly the flavored, gritty varieties. The Clear and Natural literally dissolves intanstanly and it is like drinking regular clear water. No grits! Yay!


Fiber is found in fresh fruits, veggies, and whole grains. Oatmeal with berries is an excellent way to get in some fiber. Beans and lentils are also excellent sources.


So do your body and skin a favor, consume more fiber!

This week's empties or should I say month's?

Has it been a month already?

64.  BAIN de~luxe foaming body wash Vanilla Citrus
65.  Lumene Sensitive Touch Face and Eye Makeup Remover Cleansing Cloths
66.  Elizabeth Arden Prevage Face Advanced Anti-Aging Serum
67.  John Frieda Root Awakening Shampoo
68.  John Frieda Root Awakening Conditioner
69.  Nivea Happy Sensations Body Lotion
70.  The Body Shop DeoDry Deodorant

30 more to go!

Tuesday, October 12, 2010

Sonia Kashuk® Blending Sponge


I've been wanting to try the Beauty Blender for ages now but I bought some cheap-o makeup sponges in bulk a while back and vowed to finish every last one.  But when the time came for a new foundation sponge, I didn't want to shell out $25 and possibly shipping, surprise, surpise.  I am not lucky enough to have an Ulta nor a Sephora with in 100 miles of my house!  :(  Believe me, it is quite frustrating at times.  So while perusing the cosmetic aisle at Target, as luck would have it, I find Sonia Kashuk's blending sponge for $9.99! 

Upon opening, it does have an unpleasant scent.  I was not ready to use mine straight away so I let it sit out, well air out for a few hours.  Weird there are no instructions for usage but I found it works pretty efficiently at blending and buffing in my foundation.  I went back to the packaging for guidance just to make sure and there was nothing!  Like all my other sponges of the past, I pre-moistened the sponge.  I find that it eases the application and disallows foundation absorbtion deep within the sponge.  Easy clean up! Foundation will stick after multiple applications, despite washing after every use however. 

I used my Revlon Colorstay foundation and now I am back in love with it!  The blending sponge really buffs the foundation into the skin and it truly looks flawless.  I'm so glad I found this on the shelf!  I had no idea it existed!  It's a great way to finally use up every drop of my only liquid foundation. 


I use the bottom to dab on foundation on my forehead, cheeks and chin and then start blending and buffing away.  I use the pointy top part for my nose and undereyes.  Not sure how long it will last.  I figure a few months if you wash it a few days.  I've been washing it after every use.  So far no breakdown...

Monday, October 11, 2010

More ways to get your veggies...

Why not try eggplant parmesan!  Eggplant is filled with phytonutrients with a super antioxidant punch.  They contain dietary fiber, potassium, folate and a bunch of Vitamin B. 

Eggplant Parm starts off with a simple, yet delicious marinara sauce.  It's a cinch to make your own but if you are pressed for time, your favorite jar variety will taste just as yummy.

Your recipe should include olive oil, onions, garlic, basil, oregano, thyme, rosemary, salt, pepper and of course whole fresh or canned tomatoes.  Squish them right in the pot!  Tomatoes and garlic are well known for thier antioxidant properties. As well as fresh herbs!


Then cut your eggplant to desired thickness, 1/4 inch will suffice.  Salt the tops and cover with a paper towel to absorb excess moisture.  You can do this while your sauce is simmering.  I put a heavy skillet on top of the stack to compress and draw out the moisture.  It takes about an hour, the same as the sauce.


Then build your assembly line:  flour so the egg will stick, egg so the bread crumbs will stick.  You will get a beautiful tasty crust after pan frying.


Now on to the skillet or grill pan.  I prefer the grill pan so the eggplant does not absorb too much olive oil.  They are like little sponges and sop up everything.  Make sure your olive oil is hot. 


Now on to layering your eggplant parm.  Start with a layer of sauce and then pieces of grilled eggplant.  On top of the eggplant smooth on some ricotta cheese, then sprinkle on a layer of fresh parmesan cheese.  Remember that parm cheese can be a bit salty, use sparingly.  Then on top of that sprinkle on fresh mozzarella.  The shreaded bagged variety works just as well though.


Continue building up the layers until you are close to the top of the pan.  Save room for the last layer of mozzarella!


In to a 375 degree oven...


25-30 minutes later you will have a golden and bubbly delight!


Since this is a time consuming process, I make up a few pans and freeze.  Excellent for a busy weeknight dinner.  Serve with whole wheat pasta or better yet, grilled zuchini or asparagus!

Buon appetito!

Sunday, October 10, 2010

SNOTD

Happy 10/10/10!!!

I know, I know...  More purple! 


This week's SNOTD is Sinful Colors 119 Fiji.  It goes on very sheer.  It looks darker in the bottle but goes on lighter.  This is 4 coats of the polish. It is going to take forever to fully dry.  I have some magazines lined up to read so that should keep my occupied and still for the next couple of hours if the kids cooperate of course!

Saturday, October 9, 2010

Wet N Wild Mega Plump Waterproof Mascara


I wouldn't exactly call it "mega" plump.  It took me about 3 applications to get the desired look but it never clumped up and it held my curl.  Love that!  So for $3.99 you really cannot go wrong with this mascara.  If you like mascara where you only need one layer, then this isn't for you.  If you like a product that is buildable, this will be perfect. 

As much as I love my Covergirl Lash Blast, it does not quite hold my curl like this Wet n Wild product that it half it's price!  With almost all my mascaras I have to re-curl after the mascara is semi-dry.  Not with the Megaplump. 

I'm super impressed with Wet n Wild products.  I'm not a make-up snob either, I just never paid too much attention to the end of the aisle displays.  Now they are where I will head to first.

Friday, October 8, 2010

NEW Eye Studio™ Color Pearls™ Marbleized Eyeshadow


I've been wanting to try this eyeshadow out forever!  I grabbed Silver Starlet and Lawless Lavender.


Silver Starlet is on the left and Lawless Lavender is on the right.

Swatched in the sun:


The Lawless Lavender is on top with marbleized is on the right.  Silver Starlet is on the bottom with the marbleized color on the right.  The silver looks more like a slate blue.

Here they are in the shade:


I really like these eyeshadows.  They are color coordinated, obviously.  You can just grab one and you are done in literally 2 minutes.  I sweep the lighter of the shades in my inner corner and my highlight and use the darker for my outer lid and crease.  Quick swipe of liner and a sweep of mascara and you are done.  They are nicely pigmented and have a gorgeous shimmer.

They retail at $6.99.  I was able to pick these up on a BOGO 1/2 off and had 2 coupons for extra savings of course.  But even at $6.99, they are a complete look.  When you have a 4 eyeshadow palette, make-up application can get a little complicated.  This product keeps it simple!